Designing and Fabricating a Portal Gun Toy
For my fabrication and prototyping class's final project, I needed to make a connecting device with a partner. So that my device would connect and interact with my team member's device. As both my partner, Louis Quicksell and I are fans of the cartoon Rick and Morty, we decided to make the portal gun and crystal from that show. To do this we needed to design, 3d print, and wire the portal gun.

Brainstorming
Before we decided on making the Rick and Morty portal gun, my teammate and I started with a brainstorm session. Below are some of the pictures from that session. We had many ideas but could only choose one. The ones we ruled out were either too complicated, did not fit with the assignment, or were simply not our favorite.


Sketching and Planning:
So we decided to make the Rick and Morty portal gun toy. It seemed to be within the scope of the assignment, make good use of light guides, and a fun project to work on. Now we needed to plan out our prototype and clearly understand what it is we were making. Below are some of our beginning sketches. We began by listing the possible parts, and getting an idea of the dimensions.


First Prototype:
Our next step was to make a very simple cardboard prototype. This prototype allowed us to understand the relative dimensions we were working at, and how the object would feel. This prototype was made with a laser cutter. It cut cardboard along an illustrator design so that we could fold it into shape. We then completed the prototype with a roll of toilet paper. This was a cheap, efficient and effective way to immediately start understanding the form that we were trying to make.

Sketches and Planning Part Two:
Before jumping into 3d modeling we first needed to understand exactly how the electrical components were going to fit together. This was required, as I needed to take into account how to fit these electrical components into the physical form of the design. It was also here where I began to consider which parts of the physical form I would break up. I needed to do this, as our 3d printers are only so big. Thus separate modular parts were needed to make up the larger form.

Designing a connection.
One of the biggest parts of this project was the literal connection between the two devices. My partner and I decided to tackle this problem first and design around the connection. This was a good decision as it was the main constraint on both of our designs. My partner started by designing his enclosure. I then used his design to create the enclosing section that allowed for a good fit. The connection design we used requires the user to insert down, turn, and then insert down another level. This was a good design as the two pieces cannot easily come apart accidentally.
3d Modelling the Toy Gun
Most of the work for me in this project was in designing the portal gun toy in Fusion 360. I had never used the program before, and so it took quite a while to learn. I got the hang of it however and ended up doing a pretty good job (so say I).
Making the handle was by far the hardest challenge. It involved a complicated sketch to extrusion workflow. However, after completing the handle I found a different tool in Fusion 360, which would have made it far easier. Another hard part of this modeling process was getting all of the parts to fit and hold in place. Point one of a millimeter off and a component may not fit. This became a problem with my first 3d print.


First Print
After finishing with the modeling process, I 3d printed the results. I sanded everything down to fit and considered the results. The handle-to-base fit was one of my biggest concerns at this point, but I was pleasantly surprised to find that the handle-to-base fit worked extremely well. There were however other problems. Some electronic components did not fit by small margins. The top lid of the enclosure kept breaking because of how it closed. And the front section's fitting mechanism looked too weak to survive any play from a child.


Second Print
I applied the lessons from the first print towards the design of the second. I made room for the electronics. I then changed how the front and top pieces connect to the base by using a sliding fit. This gave me more room to work with while also making a stronger, better-looking connection.
The 3d print of this second iteration came with its own unique challenges. There was no more PVA support material. PVA support material allows the 3d printer to build dissolvable supports as it creates the structure. Without it, I was forced to use PLA supports. This is generally fine but for some reason, the printer decided to print the supports in a particularly strong pattern. This made it very difficult to take out those supports. Only with large pliers, a mallet, and an electric drill was I finally able to clear out all of the support material.

Electronics
Once the model was finally separated from the support material and put together, I needed to wire it all together. Now I had never really had that much experience with electronics before. Because of this soldering was a major difficulty for me. I struggled for a while. Eventually, a friend of mine, Gero Bergk, gave me a crash course lesson in soldering. This helped immensely. I now feel that I can solder with some confidence due to this lesson.
Below you can see a schema of the wired electrical components. The physical placing of the wires got a little weird, as they had to go in and out of tunnels I made in the model. You may notice that the final portal gun has an LED screen built in. This was not wired up. It was our stretch goal to get that working. But given the time constraints, it never happened. So it is just for visual effect at the moment.


The Switch
Just as I was done with wiring, I glued my switch into place with superglue. Unfortunately, as I did so, I also glued the switch off. In trying to fix this problem, I then ended up breaking the switch. Fun, fun, fun. Luckily I found a value-added solution. Where the turning actuator was going to go, I instead added a larger switch that I found. Now the switch is in a better placement and is more usable. This did mean however that I had to redo a lot of soldering.


The Light Guides
The next step was to create and place the light guides. To do this I drew the shapes I wanted with Adobe Illustrator. I then used a laser cutter to create those shapes out of clear acrylic. Those shapes were then glued together and placed on top of the circuit playground. This was a simple way to help light travel in the direction that I wanted.


Third Iteration
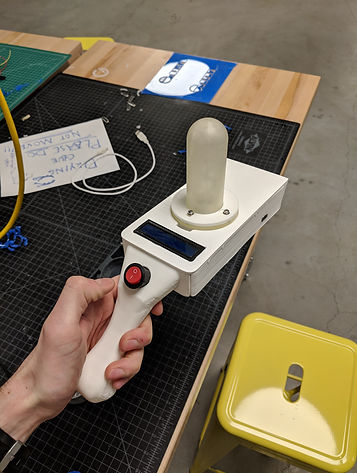
After some sanding, I was finished with my portal gun. I was going to make the third iteration. I actually printed it, out of the (much nicer) Stratasys F170 printer, but as it was a forty-hour long print I ran out of time. The second iteration then ended up being our final for this project, though I do plan on post-processing the third iteration at some point.

Conclusion
Louie Quicksell and I made this Rick and Morty portal gun. It went quite well, and we both learned a ton. Due to the nature of the assignment, Louie and I specialized in different areas of this project. To see his portion of the work, click here. Not only did he make the crystal, but he also wrote the code that allowed our two projects to communicate to each other and 'interact'. That interaction is defined by both objects flashing red when separate, and both turning green when connected.
TO DO: add final video here.